Wednesday, December 14, 2011

More Mod Podged Comic Book Letters

I have had a lot of interest in my Mod Podged Comic Book Letters lately. I am so flattered that my project has been pinned so many times on Pinterest!!!

Here is my latest creation:


These are so much fun to create and I love doing different characters. I also made the word READ for one of my friends that is a teacher. She wanted to hang them in her classroom. What a great idea! I am going to make them for my sons teachers as end of the year gifts. I had her send me a picture of them hanging on her wall:


Here are some other letters I have made as well:


You can find these custom letters in my Etsy shop here: www.melrowe.etsy.com

I hope everyone is having a wonderful Holiday Season!

Wednesday, November 16, 2011

Fringy Scarf Photo Shoot With Some Beautiful Little Models!

Today was a lot of fun. A friend of mine offered to take some really nice photos for my Etsy site. Her daughter and another friend's daughter were my little models. They did such a great job and the photos turned out so cute!


My scarves made really cute Christmas or Birthday gifts and can be purchased in my Etsy Shop here. I also have a large variety of adult sized scarves in the shop as well. I love doing custom orders, so if you're interested in something specific, let me know!

Monday, November 14, 2011

Stretchy Fabric Headband Tutorial


I see these headbands on Etsy for up to $8 each. A friend wanted me to try to make some for her girls. They turned out pretty cute! 

Supplies:
1/8 yard cotton fabric (this will be enough fabric to make 2 headbands)
4.5 inches elastic - I used 1/4 inch wide
sewing machine and matching thread
2 safety pins 
cardboard to make a pattern piece

To make the pattern, I recycled some thin cardboard. Use the photo below to draw the shape. The length across is 8 in. The height of the right side of photo is 3 1/3 inches. The height of the left side of the photo is 1 1/2 inches.

Fold your fabric in half, trace the pattern and cut with the folded edge on the 3 1/3 inch side. 


Next cut a rectangle about 6 1/2 x 1 3/4 inch. These are the 2 pieces you will now have:


Fold the main fabric piece in half lengthwise and press.


Sew along the long side, leaving openings on each end.


Pin a safety pin to the end and push through to turn the whole piece right side out.


Press open so that the seam in on the underneath side.

Sew the rectangle lengthwise.


Use the safety pin to turn the rectangle right side out. Attach the safety pin to the end of the elastic and push through the rectangle. I like to pin each side now and sew each end so that the elastic won't move.


Turn the end of the main headband piece under and put the end of the elastic piece inside that end. Sew across, making sure that you are sewing through the main piece, rectangle AND elastic. Repeat with other end.

That's it!


These measurements are for a child size. If you would like to make an adult size, just adjust the rectangle and elastic accordingly!

Wednesday, November 9, 2011

Monday, October 10, 2011

Scrappy Rosette Headbands

I have been making loads of dance skirts out of a sheer fabric. Therefore, I have some really great scraps of that fabric left over. I have seen a lot of really cute fabric rosettes on blogs lately and decided to try to make some. They are really easy!

I just twisted the fabric and rolled it into the rosette. Instead of sewing it together, I just hot glued it here and there so that it would stay together nicely. I had a bunch of jewels, so I glued them in the middle. These stretchy headbands were at Walgreens for $1.99 for a pack of 6 and 6 ponytail holders. They are really pretty and I loved the colors. I actually sewed the rosettes on the headbands and then hot glued them. Hopefully they will stay on!

Monday, August 29, 2011

Super Cute and Easy Bottle Cap Key Chains for Party Favors - Tutorial

I really don't like most of the cheap toys that are considered party favors for kids parties!

This year I have decided to make something unique for all of the kiddos. My son wanted a Super Mario Bros. themed party, so I made key chains. I figured that they can hang them on their backpacks since it's the beginning of the school year.


These are really easy!

You will need:
1 inch round graphics - Buy the ones I have here
1 inch circle punch
glue
bottle caps (flattened or not)
metal punch or nail and hammer
jump rings
chain and ring or clip
1 inch epoxy adhesive dots

Buy some printable round graphics on Etsy (or use your own), print them, and punch them out with a 1 inch circle punch.

Punch a small hole in the bottle cap where you want the jump ring to attach the chain.

Next, glue the graphic into the bottle cap with a tiny amount of glue.

Stick the epoxy dot on top of the glued graphic.

Attach the jump ring and chain into the hole in the bottle cap.

That's it! They are really easy and super cute!

Thursday, August 25, 2011

You've heard of an Easter egg hunt, but not a birthday present hunt!

My son's 5th birthday was just last week and he came up with a great idea. I always hate wrapping presents and wasting the wrapping paper!

This is what he told me, "You've heard of an Easter egg hunt, but not a birthday present hunt!"

What a great idea...I love having a reason to be lazy...

My mom and I hid his presents all over the house and he ran around finding them. He had way more fun hunting for them than he would have unwrapping them! Give it a try!

His favorite present was from Grandma and she was so nice to buy his big brother one too!


Sunday, August 7, 2011

My New Dance Skirts...enter to win one!!!

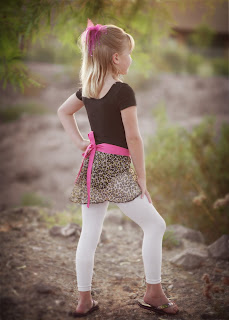
I am so excited to announce that I am going to be selling my handmade girls wrap dance skirts in a local dance studio!!! One of my friends is an amazing photographer and has just sent me the photos from our shoot..

I am so happy with them that I am going to be giving one of the skirts away!!!

I am going to use one of these photos on my tags to hang from each skirt and am not sure which one looks the best. So, I would love some input from you!

To enter my giveaway, please follow my blog and leave a comment telling me which photo you think I should use on my tags. For an extra entry, like my on facebook. The winner can choose from a few different fabrics and sizes!!!

The winner will be chosen on August 31st...so make sure I have your email address.

 1


 2


 3


 4


5

Friday, August 5, 2011

Whoopdwhoop Craft Swap

I have been participating in the Whoopdwhoop Craft Swap. It is free and a really great idea!

How it works is that you list some items on their website and receive "whoops". You get to choose how many whoops your item will "sell" for, between 1-5. When you have enough whoops, you can request any item from any other member. If they accept, your whoops will be given to that member. They will send the item to you. If someone requests your item, you will receive their whoops. Then you will be responsible for the shipping charge.

Does that make sense?

Well, I have received a beautiful mermaid print from Whoopdwhoop. I bought a cheap frame from the Dollar Store. Here is the before and after.


I just painted the frame a nice green color and glued some colored shells around the frame. I got them at Joannes. I hung it up in the bathroom and love it!

Thursday, June 23, 2011

DIY Dress From 3 Pieces of Fabric - Tutorial

I made this dress for a friend to wear to her 20th high school reunion this summer. It was super easy and really turned out cute!


For this dress, I recommend buying 2 yards of fabric. I made this with 1 1/2 yds, but it really cut it close!

I don't really measure, but just wrap the fabric around the bust and body. The bust should be tight, so that it doesn't fall down. I like to fold the fabric in half so that  I don't have to sew the top neck line.

The body part needs to be big enough to fit and hang loosely around the biggest part of the hips. If not, it will be clingy and look gross. In the middle, I gathered the body piece a bit and then sewed the two pieces together, stretching a bit as I went.

Since this is a nice stretchy knit fabric, I didn't even hem the bottom, just made sure to cut it very straight. I just cut a long strip for the tie and that's it.

When wearing it, I recommend safety pinning the tie to the dress from the inside to keep it in place and to hide the seam where the 2 pieces are attached.


Tuesday, June 7, 2011

Healthy and Yummy Chicken , Vegetable and Pasta Soup

If any of you live in an area where Bountiful Baskets is available, please try it! Check the website www.bountifulbaskets.org for availability in your area. It is a food co-op run by volunteers. I paid $15 for a basket of fruit and a basket of veggies. For $10 extra, they will guarantee all produce to be organic.  They also have add ons available. I was able to get 8 lbs. of fresh strawberries from California for $12! There is also fresh bread, herbs/spice packs, oranges, apricots, tomatoes, etc available. This is what I got this week:


Sorry about the quality of the photo! I wasn't thinking in blog mode!

I boiled chicken breasts so that it would be shredded chicken. I cut up some white potatoes, carrots and celery and cooked some pasta. I also got out a can of corn. Then I added it all to boiling water with Lipton onion soup mix. It was a little bland, so I added onion pepper salt and it was perfect! Very easy, healthy and so good!

Friday, June 3, 2011

$3 Bird Feeder - Another Mod Podge Project

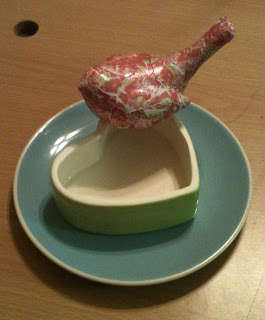
This is my mom's birthday gift this year. Isn't it cute?

I got all 3 pieces at the $1 store. I Mod Podged the bird with scrapbook paper and used E-6000 to glue them together. It was such an easy project. The hardest part was waiting for the glue to dry!

Sunday, May 22, 2011

End of the School Year Gift Idea - Otter Pop Holder Tutorial

The end of the school year is coming up and I want to do something cute for the kids. I saw this idea somewhere and can't remember where...sorry!

I'm going to make an otter pop holder for each kid and bring otter pops for the kids on the last day of school. They help to keep their little hands from getting too cold while eating them.

Just cut 2 rectangles of felt. Mine are about 2 1/2 inches by 4 1/2 inches. Lay them on top of each other and zig zag stitch both sides, which will leave a tube. For decoration purposes, cut the sides with pinking shears. I'm sure the kids will love these and they're so easy. It should take under an hour to make enough for the whole class!


Check out the linky parties to the right that I'm linking up to this week!

Tuesday, May 10, 2011

Yarn or Fabric Wrapped Clothesline Rope Bangle Bracelet Tutorial


These are super cute, easy and cheap bangle bracelets. For a couple of dollars, you can make a whole bunch of them!

You will need rope, painters tape, yarn or long strips of fabric, glue (Weld Bond or hot glue). I got an 80 ft clothesline at the dollar store and Big Lots has great unique yarn/fibers for a dollar as well.

Wrap the clothes line in a circle 3 times and cut it to fit your wrist.

Wrap the tape around the piece of rope to secure it.

Keep wrapping the tape around until you get a secured circle.


Now start wrapping th ring with the yarn/fabric. Be sure to tuck the end under so that it will not unravel.


When you have wrapped the whole ring, glue the end to the inside of the bangle. If you use weld bond or a glue similar, you will have to hold the end down until it starts to dry or it won't stick very well. If you use a wool yarn, you will have to hold it down longer and use more glue. It's hard to make it stick!

That's it!


If you haven't yet, check out Debbiedoos for an awesome new blogger linky party!

Saturday, May 7, 2011

Henderson Food Revolution - School Food Garden

So, I have been a total blog slacker lately!

One of my excuses is that I'm working on getting a part time job making bags for a local Las Vegas bag designer. If it all works out, I will be trying to make about 50 bags per week! They are cut and pinned and ready to serge. That's the problem. I need a serger and am on a mission to get a good deal!

Another excuse is that I have been trying to start a local Food Revolution. I have been really concerned about the food that is served at my son's school. It is just as bad as what Jamie Oliver saw in Los Angeles on his Food Revolution show. I found out that it is possible to start a local Food Revolution facebook page for your own town!

So, that's what I did. I have 32 followers so far, so if you want to support us, you can like the page at Henderson Food Revolution.


If you are wanting to help do something for the cause, please click here to sign the petition to help ban sugary milk in schools! Check out Jamie's Facebook page here.

My goal is to get as many Henderson, NV parents who care about our children's nutrition at school together and try to get a few simple changes made. One of my friends and I are planning on starting a school garden in the fall and we have the support of the school's Principal. What a great start!

I will post our progress as the school year gets closer. If anyone has been part of a school/community garden and has any tips, please send them my way!
Friday, May 6, 2011

Teacher's Appreciation Week Gift - Mod Podged Clipboard Tutorial


Of course I waited until Thursday night to decide what I was going to make for my son's teacher for Teacher's Appreciation Week! Well, I just finished this super cute clipboard!

I bought a clipboard at a thrift store about 3 months ago for $1.00 and finally got around to using it. I used 2 coordinating pieces of scrapbook paper, some grossgrain ribbon and Mod Podge.

The how to:
1. Measure the clip board and cut the paper to fit the lengths you want to cover. You may want to use an exacto knife to cut around the metal clip part.
2. Brush some Mod Podge over the clipboard and stick the first paper to it. I use my finger to smooth the air bubbles out. Then brush some more Mod Podge on top of the paper and smooth it out as well.
3. Repeat with the second piece of paper. I overlapped the papers, but you could cut and line them up as well.
4. Using scissors, round the edges of the paper to match the rounded edges of the clipboard.
5. Cut small pieces of ribbon and tie them on to the clip.

That's it! This makes a super easy, cheap gift! I had all of the supplies, so it cost me nothing to make.

Tuesday, April 26, 2011

Great Potluck Recipe - Pineapple & Pretzel Fluff

I had a potluck to go to and wanted to bring something different. I found a great recipe for Pineapple Pretzel Fluff on Allrecipes.com. It turned out great. I will definitely be making this again!


  • 1 cup coarsely crushed pretzels

  • 1/2 cup butter or margarine, melted

  • 1 cup sugar

  • 1 (8 ounce) package cream cheese, softened

  • 1 (20 ounce) can crushed pineapple, drained

  • 1 (12 ounce) container frozen whipped topping, thawed


  • In a bowl, combine pretzels, butter and 1/2 cup sugar. Press into a 13-in. x 9-in. x 2-in. baking pan. Bake at 400 degrees F for 7 minutes. Cool. 


  • Meanwhile, in a mixing bowl, beat cream cheese and remaining sugar until creamy. Fold in pineapple and whipped topping; chill until serving.


  • Break pretzel mixture into small pieces; stir into pineapple mixture.


  • .


This dish was really great. I really loved dipping apples and grapes in it. I think I will be substituting strawberries for the pineapple as well.