This dish was really great. I really loved dipping apples and grapes in it. I think I will be substituting strawberries for the pineapple as well.
Tuesday, April 26, 2011
Great Potluck Recipe - Pineapple & Pretzel Fluff
I had a potluck to go to and wanted to bring something different. I found a great recipe for Pineapple Pretzel Fluff on Allrecipes.com. It turned out great. I will definitely be making this again!
This dish was really great. I really loved dipping apples and grapes in it. I think I will be substituting strawberries for the pineapple as well.
This dish was really great. I really loved dipping apples and grapes in it. I think I will be substituting strawberries for the pineapple as well.
Sunday, April 24, 2011
Tie Dye Projects from Leftover Easter Egg Dye
Happy Easter!
This year I bought my boys tie dye Easter egg dye kits. They turned out pretty cool. I wanted to come up with something to use the extra dye on.
Pillows!
I found some nice white flannel in my fabric stash and cut up some rectangles. Then I twisted from corner to corner diagonally. Next I tied the fabric in a knot and tucked in each end.
My boys got to do the fun part. We had a very small eye dropper left from the egg kit. I had the boys squirt random colors all over the tied up fabric. I made sure that they got deep inside the knot as well.
Then we untied the fabric and voila! Cute pillow fabric was born!
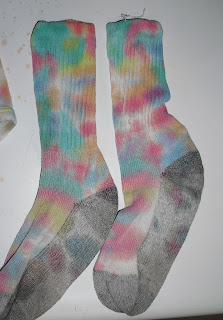
My 4 yr old wanted to tie dye some of his undies and socks as well. So, of course we did. They turned out pretty cool too.
I think that most of the dye will wash out of the socks and undies, but it was still a super fun project. If you can come up with things to tie dye that you don't have to wash, that would be the best. Happy Tie Dying!
Tuesday, April 19, 2011
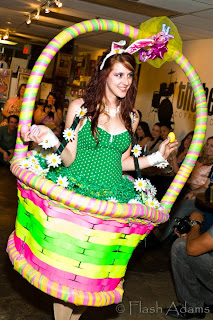
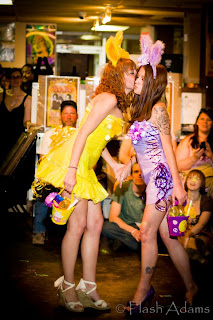
Couture Community Challenge - Las Vegas Charity Fashion Show
This weekend I was lucky enough to attend a local Fashion Show here in Las Vegas benefiting the Easter Seals!
Susan Toshes-Deneau of Altered Nation Designs has been putting together these shows, challenging local designers to make unique dresses out of candies, wrappers, gift wrap, etc. The theme of this show was Easter. There will be a 4th of July show coming up as well as a couple of other summer events. I am looking forward to the Halloween event and hope to be able to participate as a designer!
We have some super talented designers in this town! What do you think?
Please visit the Facebook page for Couture Community Challenge to see past events and more information.
Thank you Bryan Adams of Flash Adams Photography for lending me his fantastic photos of the event!
Monday, April 18, 2011
National Wildlife Federation Auction and Giveaway!!!
Check out this amazing auction and giveaway on Upcycled By Ash!
Find the auction through her facebook page: National Wildlife Federation Auction - Upcycled By Ash.
She has some amazing items including some bags upcycled from Alyssa Milano's pants. Too funny!
Find the auction through her facebook page: National Wildlife Federation Auction - Upcycled By Ash.
She has some amazing items including some bags upcycled from Alyssa Milano's pants. Too funny!
I love these upcycled water bottle cuff bracelets as well
Check out this blog for some great upcycling ideas!
Don't forget to enter the giveaway! I can't believe that the winner will receive all of these items!
I am linking to Debbiedoo's Newby Party. If you have been blogging for under 1 year OR have under 100 followers, link up and join the fun!
Friday, April 8, 2011
Tutorial - Free Facebook Photo Collage for Your Computer Desktop
I just happened to come across a really cool site tonight. I have so many pictures on my computer and memory cards that I haven't done anything with. All of a sudden, it's really bothering me and I want to create some books, collages, etc.
This is a free service that you can upload pictures from your facebook, flickr, or from your computer. It is super easy to make and you don't have to give them any personal information! If you would like, you can order prints of the poster collages for a pretty decent price as well.
Go to www.postermywall.com and click on "Create your poster now".
Next click Facebook InstaCollage
Choose your orientation
Now you will have to allow access to your facebook account. It will pull up all of your albums. Click the photos that you want to appear on your poster. For a good quality poster, the site recommends that you choose at least 80 photos. It seems like a lot, but I have way more than that on my page.
When you have chosen your photos, it will give you a few more options for borders, etc.
When you are finished, click on Download at the top of the page. It will allow you to save to your computer. It will automatically save with a different extension, although it is a jpg. So, you will need to save it with .jpg in order to be able to open the collage.
Go to your control panel and choose Display. Change the photo in the Desktop tab to your poster and it makes the best desktop background ever!
It will look better than it does on my blog because it is a lot bigger!
Monday, April 4, 2011
How to Disguise a Tear in a Dress Neckline
My friend's daughter got a small tear in the neckline of her dress. It was definitely a dress that had to be saved!
First I zig zag stitched across the tear a couple of times.
Then I sewed a square of velcro right in the middle along the top of the neck line.
Now is the fun part. I picked out a few pretty flowers, cut the green part down on the back, and glued velcro to them. (Some flowers will come apart if you cut the plastic off. If this happens, you can hot glue the pieces back together!)
Now she has her super cute dress with interchangeable colored flowers!
Saturday, April 2, 2011
Eco-Friendly Party Favor Bag Idea - Capri Sun Wallet Tutorial
Capri Suns are a great thing to upcycle. I have been making tote bags, lunch bags, purses, aprons, wallets, belts, etc. My MOMS Club is going to be hosting a playdate at an indoor playground for a group of moms and kids from SafeHouse. SafeHouse is a safe place for women and children to stay when they break away from abusive situations.
We want to give both the moms and kids a "goody bag" when they leave. I thought that a great idea would be to use Capri Sun Wallets as the bags. It's something kids love and a great way to upcycle and not create more trash for the landfill.
I go to my sons school and collect Capri Sun pouches at lunch. The lunch room is really loud, but it's actually a lot of fun to hang out with the kids.I bring my Capri Sun tote bag and walk around to the lunch tables and collect the empties. It's really funny to watch the kids try to suck them down when they see me coming. I have been able to collect as many as 100 pouches is one day!
Once you get enough pouches, throw away the straws and peel any remaining straw wrappers off of the front. Next, put them in your sink and slit the bottom open. Then rinse them clean.
You will need 4 cleaned pouches to make a large wallet/goody bag.
Using a wide zig zag stitch, sew 2 pouches right next to each other. Make sure to overlap the pouches enough to make sure that they are sturdy. Sew 2 more together.
Then overlap the one row on top of the other and zig zag them together. Now you will have a rectangle made of 4 pouches.
Turn the rectangle so that the labels are upside down, but the silver side is showing. Fold the bottom side up. This will be the actual pouch.
Now zig zag stitch through both layers, starting on one end, making your way across the top and back down the other side.
This stitched side will be the flap. Fold it down and secure with some sticky velcro.
You're done!
If you don't want to make one yourself, you can check out my Etsy Store for my Capri Sun creations or my Facebook page, Made by Mel-Upcycle the Sun. A percentage of my Capri Sun sales will be donated to my son's school, David M. Cox Elementary!
Don't forget to "like" my You Made That? facebook page as well!
Subscribe to:
Comments (Atom)


